Scenic Photography – Timing is Everything

If you want to get memorable outdoor photographs, it is not enough to find a good location or angle; you have to be patient and wait for the right lighting.
The Best Tip for Landscape Photographers
When I evaluate landscape photographs, I see one avoidable choice made over and over. Photographers of all skill levels often take their landscape photographs in the middle of the day. But if you take a landscape any dawn and before dusk, the sky is too bright. The clouds will disappear into the bright sky, and the colors will be less rich (washed out) and – unless you are in a tropical place – the any water in your picture will turn out gray; like the sky.
There are two “perfect” times to take pictures outdoors; one is in the morning – as the sun is rising or just before – and the other is in the evening – at sunset, dusk and even twilight. Typically, the morning hour looks cold (blue light) – which can be wonderful if you have a snowy or frosty landscape – and the sunset light is warm (yellow light) – which which works great for just about everything else. This yellow light is why photographers call the hour just before sunset the “Golden Hour.”
For outdoor portraits, I really like the “Golden Hour.” For scenic pictures, I wait until it is nearly dark (usually dusk or even twilight).
Why Dusk is the Best Time for Landscape Photos
With landscapes (bridges, mountains, real-estate, etc.) the sky is almost always a prominent part of the picture. A light blue sky forces the camera to adjust in such a way that the mountains, bridges, etc. end up dark and underexposed. If you over expose the photo to get the mountains and bridges spot on, then the sky will be so overexposed that it will be a distracting white spot on the top third of your picture.
A dark sky is dramatic. In black and white pictures, you can use an orange filter on the lens to darken the sky, but in a color picture the only way to make sure the sky is dark is for the sky to actually be (drum roll please) dark!
Golden Gate Bridge Example
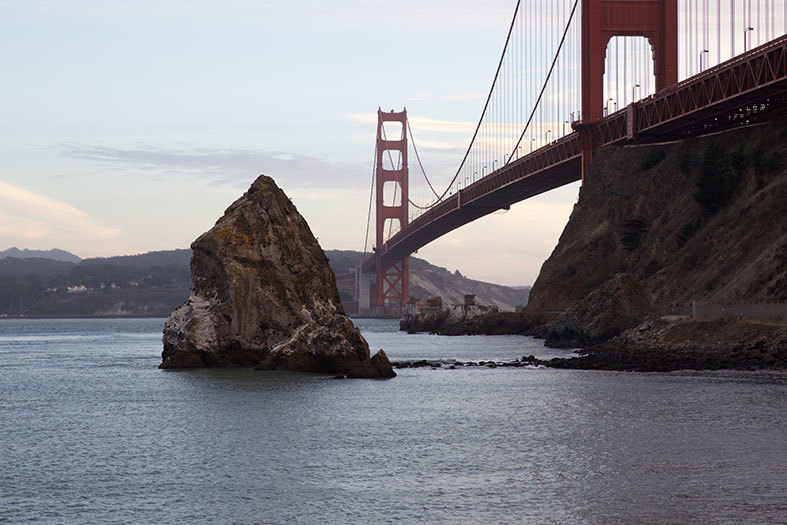
Recently, I went to San Francisco. The Golden Gate Bridge is so iconic I just had to bring my nice camera (and tripod). I thought it might make a nice lesson, so arrived early to catch a few “bad” lighting pictures for comparison. I found a nice spot, setup my tripod and settled in for the evening. Here is what it looked like when I first got there.
Normally, I would arrive close to dusk so I don’t have freeze my tush off while waiting for dark to arrive. Man, was it cold!
While waiting for the right light, I noticed something interesting (at least it was interesting to me) More that a dozen people – some sporting VERY expensive equipment – came to the same location, took a picture or two and then bolted. They weren’t willing to stand their (get cold) and wait for the best light.
TIP: If you simply are willing to be patient and be a bit uncomfortable, you will take better pictures than the average bear. Patience could be the difference between a “been there” picture and a photograph you enlarge and put on your wall (or better yet … sell copy after copy online).
How the Light Changed (Improved)
Here is a set of pictures showing how the lighting changed in the course of about 1 hour.
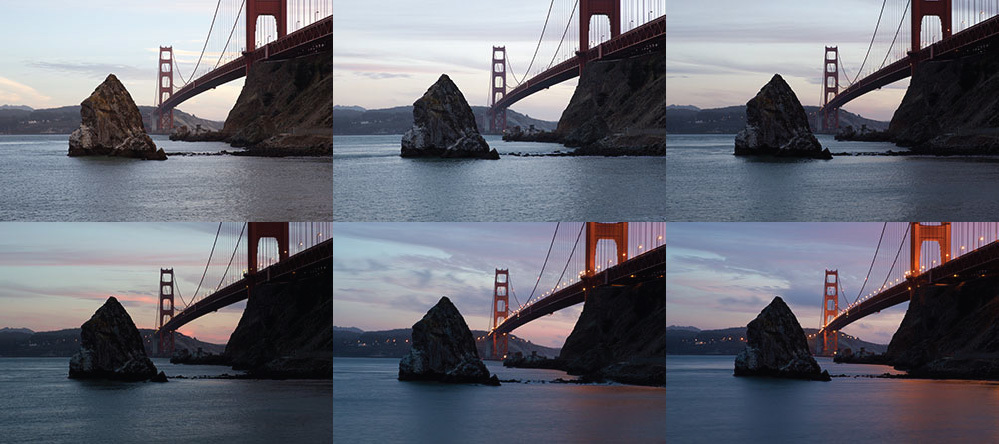
In the early shots, the sky was bright and the bridge was dark (compared to the sky). As time passed, the sky got darker and darker (and so did the bridge). But as the lights came up on the bridge, the bridge was about the same brightness as the sky. It wasn’t long before the bridge became the brighter object.
This is the moment that will get me what I want; a dark sky and a lighted up bridge.
Helpful Hint: Software Can Help
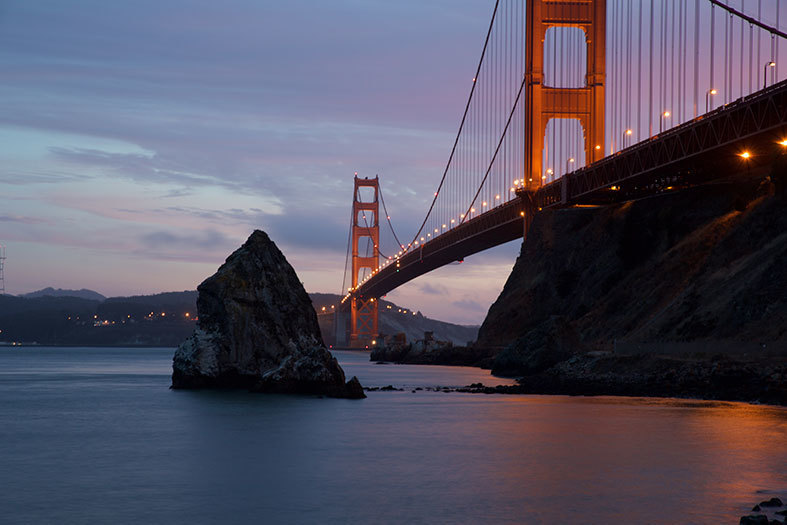
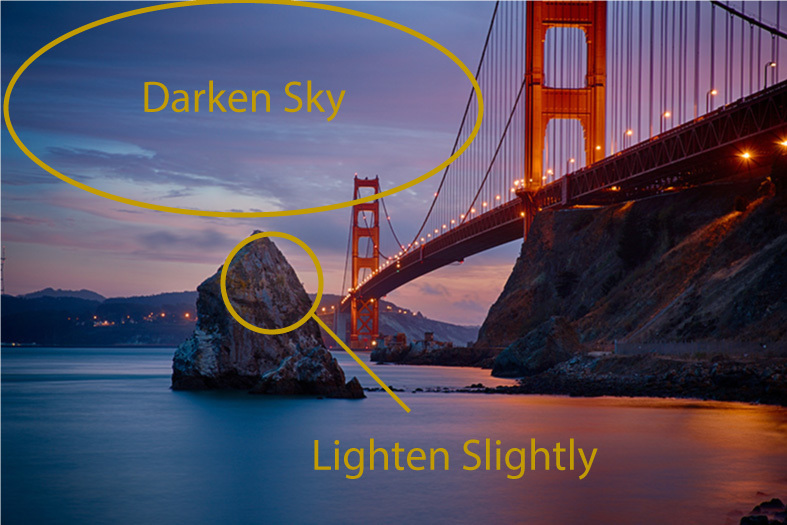
The picture is “okay,” but to my eye there’s a problem, the huge rock in the water has no light on it and looks like a black hole in the picture. I can do a lot with software, but I can’t brighten up details if it’s too dark. I need to strike a happy medium between the darkness I want in the sky and brightness I need in order to see details in the rock. Which means I’m going to need to use software.
When the sky is dark enough, I can afford to over expose the picture slightly (in this case I used exposure compensation of +1) to bring out some of the details in the rock without making the sky super bright.
It isn’t perfect, but it’s close enough that I can tweak it the rest of the way with software.
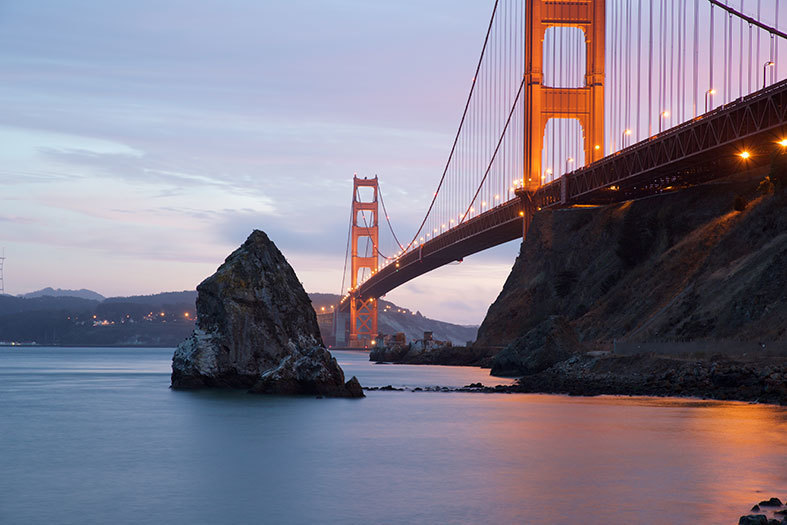
With software, I darkened the sky, water and the bridge (because I had to over exposed them) and brightened the rock just enough to see some detail but not so much that it looks unrealistic. Viola!
One Final (Important) Point
If you look at the water in the picture I took when I arrived (near the top of the article) it looks gray and choppy (meaning you can see the ripples). With bright light, the shutter-speed is faster and freezes the motion.
The water in the final picture looks blurry. As the day turned to night, I had to use a longer and longer shutter speed. The waves had a long time to move around while the shutter was open, which makes the water look smooth.
Another thing I like about long exposures in the dark is that the water reflects the colors of the lights around it. The water on the left of the photo picks up the blue colors in the sky and the water on the right picks up the orange from the bridge lights. It makes all the colors work together quite nicely.
Learn More with Our Photography Courses
If you are interested in further developing your skills, we offer self-paced, video-based digital photography courses.
Word of Encouragement
You can learn to take great pictures. You just have to be patient and commit to learning new techniques and practicing what you learn.